Multi-Factor Authentication with Spring Security
Intro
This is the long overdue follow-up to my TOTP tutorial. Using the latest and greatest Spring Boot and Spring Security, I show you how to implement Multi-Factor Authentication (MFA) based on time-based one-time passwords in this tutorial.
Danger Zone
Security is a sensible topic and I am going to disable/override some sensible defaults within Spring Security. Everything I describe below is for educational purposes only and should not be used in production without further research. Treat the code as a proof-of-concept and not as a production-ready solution.
Architecture
Before we dive right in, let’s take a moment to recap how Spring Security operates so I can then sho you how my approach fits into that architecture.
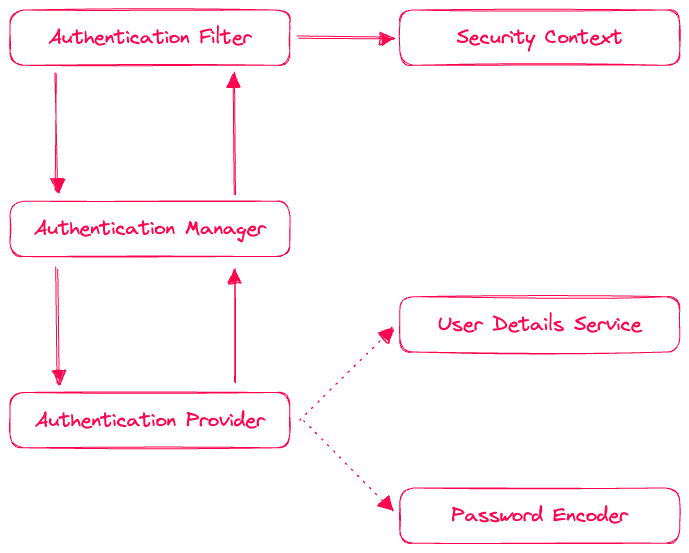
Spring Security is a (servlet) filter-based security framework. During runtime, there is a chain of filters that are applied to every request in a pre-defined sequence. Once a filter finishes, it delegates to the next filter in the chain.
What we are interested in in this tutorial are the authentication filters. These filters convert an authentication request into an authentication object. This object represents an authentication attempt, so it is not considered authenticated initially.
For that, the filter delegates to an authentication manager, which acts as a unified interface for all things authentication. The manager itself maintains a collection of authentication providers which implement the actual authentication logic.
Typically, there is a provider for each authentication mechanism, e.g. one for username/password authentication, one for JWT authentication, and so on. The manager delegates to each provider in turn until one of them returns a successful authentication object.
This is where you will also see implementations of the UserDetailsService and a PasswordEncoder - these two usually go together and are used to load a user from a database and to encode/verify passwords.
So let’s look into how this tutorial fits into that architecture:
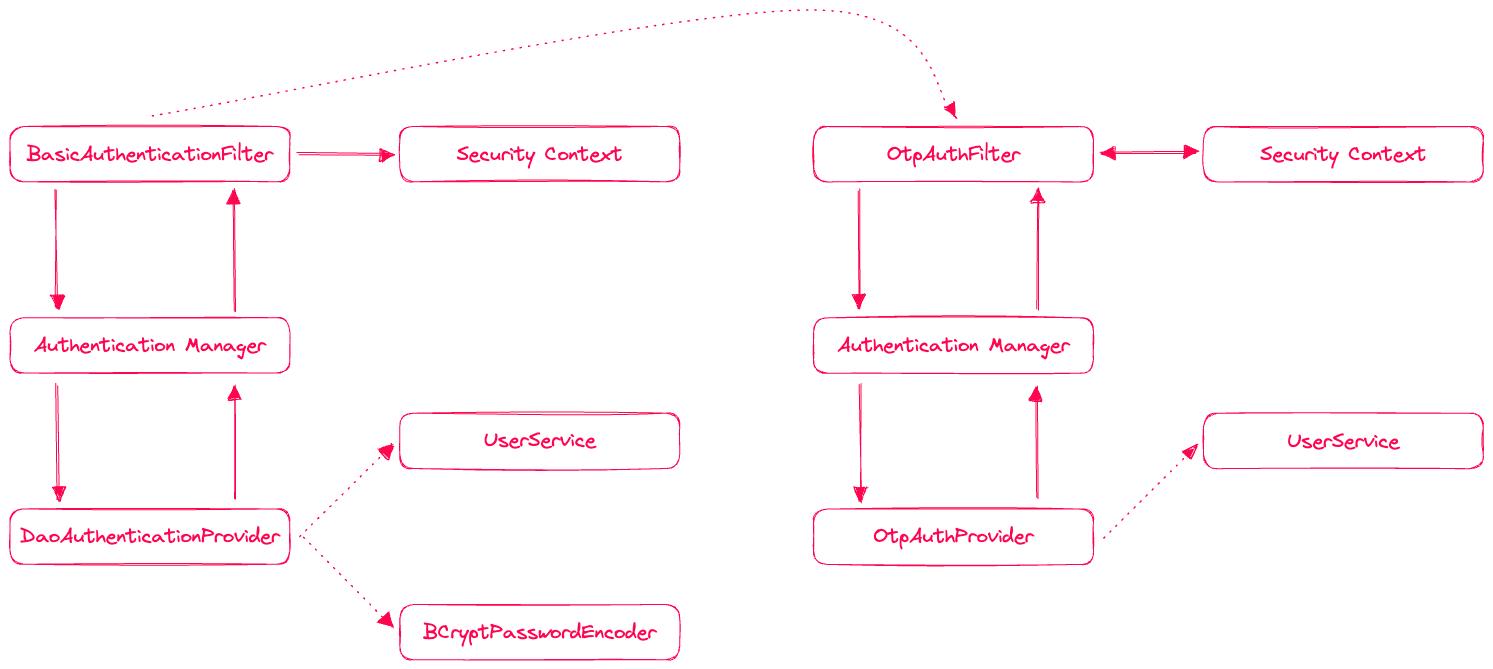
MFA should be optional, either a user has enabled it or not. Either way, we need to authenticate the user first and then check if the user requires MFA. The initial authentication will be done using basic authentication and the respective machinery of filters, managers, and providers.
As you can see in the image, once a user has been authenticated successfully, the authenticated authentication object is stored in the SecurityContext.
At this point we will place a new authentication filter in the chain, directly after the basic authentication filter has finishes its work. Our filter will convert the request into an authentication object - for which we will introduce a dedicated class.
The authentication object is passed to the authentication manager, which in turn will delegate to an authentication provider that we will create. This provider will check the provide one-time password against the MFA device of the user and if it matches, the user is granted access.
With that said..
Let’s Code
When we create a new project and bring in the dependency for Spring Security, it will be configured with some sane defaults already. Upon starting the application we can see that there is a password generated for the default user, named “user”.
We start with some boilerplate code, by adding a controller UserController that is handling GET requests at /users/me and will simply return the current Principal. (In a real-life application you should never expose the naked principal object since it might leak sensitive details!).
@RestController@RequestMapping("/users")class UserController { // PIPO: Principal In, Principal Out @GetMapping("/me") fun me(principal: Principal): Principal = principal}For this to work, we must require authentication for that endpoint. This is where we create a SecurityConfig to manage everything related to security.
@Configuration@EnableWebSecurity(debug = true)class SecurityConfig { @Bean fun chain(http: HttpSecurity): SecurityFilterChain { return http .authorizeHttpRequests { it.anyRequest().authenticated() } .httpBasic(Customizer.withDefaults()) .build() }}This setup does a few things, it
- switches to debug mode, which enables us to see incoming request data and the current filter chain,
- requires authentication for all requests, and
- enables basic authentication.
We can now send a request to the /users/me endpoint and see that we are getting a 401 Unauthorized response. If we add the basic authentication header, we can see that the request is now successful (replace with the password that is generated for you):
http -a user:ebed822e-3f3c-4e86-818d-3b1405100235 :8080/users/meWith the authentication working, we can now build the MFA functionality. We start by creating a OneTimePasswordDevice interface. There are multiple means of MFA, e.g. using SMS, email, YubiKey, or Google Authenticator. We will implement the latter.
interface OneTimePasswordDevice { val id: UUID val name: String fun secret(): String fun confirm(code: String): Boolean fun confirmed(): Boolean fun accepts(code: String): Boolean}Each device has a UUID so we can identify it globally (in case we want to store them in a database). It also has a name, that is provided by the user to identify the device (i.e. ‘My Google Authenticator’).
Then there are methods for the secret, which we have to show the user so they can add it to their authenticator app, and a method to confirm a code. This is the method that will be called by the authentication provider to verify the code that the user has entered.
Here is the implementation for the GoogleAuthenticatorDevice, (the GoogleAuthenticator is provided by the TOTP library we are using):
class GoogleAuthenticatorDevice( override val id: UUID = UUID.randomUUID(), override val name: String, private val secret: String = GoogleAuthenticator.createRandomSecret(), private var confirmed: Boolean = false) : OneTimePasswordDevice { private val authenticator = GoogleAuthenticator(secret) override fun confirm(code: String): Boolean { if (accepts(code)) { confirmed = true } return confirmed() } override fun confirmed(): Boolean = confirmed override fun accepts(code: String): Boolean { return authenticator.generate() == code } override fun secret(): String = secret }Next up is our implementation of the UserDetails. This interface describes a user within Spring Security. But since it is not aware of a MFA device, we need to create our own implementation. We can use a neat feature of Kotlin here and delegate to an existing implementation for most of the methods.
class TokenUser(private val details: UserDetails) : UserDetails by details { var device: OneTimePasswordDevice? = null override fun toString(): String = details.username fun requiresMfa(): Boolean { return device?.confirmed() == true } }Our TokenUser expects an existing implementation of UserDetails and uses delegation to forward all calls to that implementation. Since our TokenUser itself implements UserDetails we are required to implement each method of that interface, but not with delegation in place.
All we have to do is to add a device property to the TokenUser and implement the requiresMfa() method, which checks if the device is confirmed. And that’s it!
The next steps are adding our own implementation of the UserDetailsService along with a specific PasswordEncoder
@Componentclass UserService(private val encoder: PasswordEncoder) : UserDetailsService { private val users = mutableMapOf<String, TokenUser>() override fun loadUserByUsername(username: String): UserDetails = byUsername(username) fun byUsername(username: String): TokenUser = users[username] ?: throw IllegalArgumentException("User $username not found") fun register(username: String, password: String) { val user = User .withUsername(username) .password(encoder.encode(password)) .authorities("root") .accountExpired(false) .disabled(false) .build() users[username] = TokenUser(user) } fun attachDevice(username: String, name: String): OneTimePasswordDevice { val user = byUsername(username) val device = GoogleAuthenticatorDevice(name = name) user.device = device return device } fun confirmDevice(username: String, code: String): OneTimePasswordDevice { val user = byUsername(username) val device = user.device ?: throw IllegalStateException("No device attached") device.confirm(code) return device } fun attachConfirmedDevice(username: String, name: String, secret: String): OneTimePasswordDevice { val user = byUsername(username) val device = GoogleAuthenticatorDevice(name = name, secret = secret, confirmed = true) user.device = device return device } }A lot is going on here, so let’s go through it step by step. First, we have a map of users, which we use to store the users in memory. In a real-life application, you would probably use a database here.
We need to implement loadUserByUsernamefrom the UserDetailsService and we delegate to our own byUsername method which returns a TokenUser for the given username.
The register function creates a new user, using the builder pattern provided by Spring Security. We are using the PasswordEncoder to encode the password and then store the user in our map.
We also add a bunch of functions to attach and confirm user devices. The way this works is that we create a new device and attach it to the user. But we want to make sure that the user really has access to it, so they usually scan a QR code that includes the secret and then can generate codes. So we require a correct code to confirm the device.
Now we also need to provide a PasswordEncoder ourselves. We are using the BCryptPasswordEncoder and add it to the context as part of our SecurityConfig.
@Configuration@EnableWebSecurity(debug = true)class SecurityConfig { @Bean fun chain(http: HttpSecurity): SecurityFilterChain { return http .authorizeHttpRequests { it.anyRequest().authenticated() } .httpBasic(Customizer.withDefaults()) .build() } @Bean fun encoder(): PasswordEncoder = BCryptPasswordEncoder() }At this point, Spring Security no longer generates a default user for us, so we can use the UserService and generate one when the application starts. Here is how:
@SpringBootApplicationclass App { @Bean fun run(users: UserService) = CommandLineRunner { val username = "hello@axgr.dev" users.register(username, "swordfish") users.attachConfirmedDevice(username, "Google Authenticator", "AKMW3WXXWBHAMAHC") } } fun main(args: Array<String>) { runApplication<App>(*args)}We create a new user with the username hello@axgr.dev and password swordfish. We also attach and confirm an MFA device with a pre-defined secret (so we can use it in our authenticator app). After another restart of the application, we can log in as follows.
http -a hello@axgr.dev:swordfish :8080/users/meThe entry point to our authentication mechanism is a dedicated filter, the OneTimePasswordAuthFilter. It’s purpose is to convert the incoming request into an authentication object and delegate the actual authentication to a dedicated provider.
Here is the initial version of the filter.
class OneTimePasswordAuthFilter() : OncePerRequestFilter() { override fun doFilterInternal(request: HttpServletRequest, response: HttpServletResponse, chain: FilterChain) { chain.doFilter(request, response) }}As you can see, it is not doing much. It simply delegates to the next filter in the chain. We are extending OncePerRequestFilter to make sure that our filter is also invoked once per request. Otherwise it may happen that the filter is invoked multiple times for a single request, which we don’t want.
This filter can now be added to the filter chain, directly after the basic authentication filter has finished it’s work. For this we update the security config as follows.
@Configuration@EnableWebSecurity(debug = true)class SecurityConfig { @Bean fun chain(http: HttpSecurity, users: UserService): SecurityFilterChain { return http .authorizeHttpRequests { it.anyRequest().authenticated() } .httpBasic(Customizer.withDefaults()) .addFilterAfter( OneTimePasswordAuthFilter(), BasicAuthenticationFilter::class.java) .build() } @Bean fun encoder(): PasswordEncoder = BCryptPasswordEncoder()}As you can see, I have also used @EnableWebSecurity(debug = true), another setting that you should never use in production. But during development it allows us to peek at the actual filter chain. It should look something like this.
Security filter chain: [ DisableEncodeUrlFilter WebAsyncManagerIntegrationFilter SecurityContextHolderFilter HeaderWriterFilter LogoutFilter BasicAuthenticationFilter OneTimePasswordAuthFilter RequestCacheAwareFilter SecurityContextHolderAwareRequestFilter AnonymousAuthenticationFilter SessionManagementFilter ExceptionTranslationFilter AuthorizationFilter]This tells us, that our OneTimePasswordAuthFilter is indeed invoked after the BasicAuthenticationFilter. With that in place, we will build our own implementation of the Authentication interface. It is called OneTimePassword and it, again, decorates an existing authentication. Similar to how we did it with the UserDetails. This is because we want to preserve the existing (basic) authentication and only add the one-time password to it.
class OneTimePassword(val initial: Authentication, val code: String) : Authentication by initial { override fun getCredentials(): Any { return this.code }}Not a lot to see here, we simply delegate to the existing authentication and add the code as the credentials. This is important because the authentication provider will use the credentials to verify the code.
Speaking of it, here is the OneTimePasswordAuthProvider that implements the actual authentication logic.
@Componentclass OneTimePasswordAuthProvider(val users: UserDetailsService) : AuthenticationProvider { override fun authenticate(authentication: Authentication): Authentication { val auth = authentication as OneTimePassword val user = users.loadUserByUsername(auth.name) as TokenUser val device = user.device ?: throw IllegalStateException("No device attached") if (user.requiresMfa()) { if (!device.accepts(auth.credentials.toString())) { throw BadCredentialsException("Incorrect OTP!") } } return auth.initial } override fun supports(authentication: Class<*>?): Boolean { return authentication == OneTimePassword::class.java }}The authentication manager “asks” each available provider whether they can handle a specific type of authentication. Our provider is only able to handle the OneTimePassword authentication that we have just created. We can safely assume that the responsible authentication manager will only delegate to our provider if it is able to handle the authentication.
This is why we cast the Authentication to a OneTimePassword immediately. We look up the user, based on the existing authentication and check whether MFA is required. If so, we check whether their device accepts the provided code and raise an exception otherwise. This exception will be translated to an HTTP 401 response.
If you run the application now you will realize that authentication no longer works..
This is because some of the defaults that Spring Security provides are no longer in place because we added an AuthenticationProvider to the context (using @Component). Doing so, automagically removes the DaoAuthenticationProvider which is the authentication provider that handles username-password authentication. So let’s add it back in:
@Configuration@EnableWebSecurity(debug = true)class SecurityConfig { @Bean fun chain(http: HttpSecurity, users: UserService): SecurityFilterChain { return http .authorizeHttpRequests { it.anyRequest().authenticated() } .httpBasic(Customizer.withDefaults()) .addFilterAfter( OneTimePasswordAuthFilter(), BasicAuthenticationFilter::class.java) .authenticationProvider(DaoAuthenticationProvider().apply { setUserDetailsService(users) setPasswordEncoder(encoder()) }) .build() } @Bean fun encoder(): PasswordEncoder = BCryptPasswordEncoder()}We also need to add our UserService as a dependency since DaoAuthenticationProvider requires a UserDetailsService to be set. We also need to set the PasswordEncoder that we created earlier. With this change, everything should be back to normal.
All that is left, is writing the glue code that connects our filter (and the request) with the authentication provider. We start by adding a little helper here, that is converting a request to our OneTimePassword authentication.
class OneTimePasswordConverter(private val initial: Authentication) : AuthenticationConverter { companion object { private const val OTP_HEADER_NAME = "otp" } override fun convert(request: HttpServletRequest): OneTimePassword? { val otp = request.getHeader(OTP_HEADER_NAME) if (otp == null || otp.isBlank()) { return null } return OneTimePassword(initial, otp) } }We expect clients to submit a valid MFA code in the otp header. We are using the AuthenticationConverter interface to convert the request to an authentication object. This is the same interface that the BasicAuthenticationFilter uses to convert the request to a UsernamePasswordAuthenticationToken. The converter also needs access to the existing authentication so we can decorate it with the one-time password.
The OneTimePasswordFilter can now use the converter and we can fill in the missing code:
class OneTimePasswordAuthFilter(private val manager: AuthenticationManager, private val users: UserDetailsService) : OncePerRequestFilter() { companion object { private val log = LoggerFactory.getLogger(OneTimePasswordAuthFilter::class.java) } override fun doFilterInternal(request: HttpServletRequest, response: HttpServletResponse, chain: FilterChain) { val initial = SecurityContextHolder.getContext().authentication if (initial.isAuthenticated) { val user = users.loadUserByUsername(initial.name) as TokenUser if (user.requiresMfa()) { val otp = OneTimePasswordConverter(initial).convert(request) if (otp == null || otp.code.isBlank()) { log.info("No OTP code provided.") response.status = HttpServletResponse.SC_UNAUTHORIZED response.setHeader("WWW-Authenticate", "OTP") return } try { val authed = manager.authenticate(otp) SecurityContextHolder.getContext().authentication = authed } catch (cause: AuthenticationException) { response.status = HttpServletResponse.SC_UNAUTHORIZED return } } else { log.info("User ${initial.name} doesn't require a token.") } } chain.doFilter(request, response) }}The filter needs access to the AuthenticationManager so it can pass the authentication to it (which in turn delegates it to our authentication provider). The filter grabs the existing authentication from the security context and double-checks that the request is authenticated.
It then loads the respective user and also checks whether MFA is required. If that is the case, it converts the request to a OneTimePassword authentication and if that fails, it returns a 401 Unauthorized response.
Our backend needs a way to tell clients about the missing one-time password code. Because at this point, the client has already successfully authenticated, so just returning a 401 is not enough. We need to tell the client that they need to provide a one-time password.
We do this by setting the WWW-Authenticate header to the value OTP. This is not a standardized scheme to use, but will do the trick so clients can respond to the header and prompt users to enter a code from their MFA app of choice.
If everything goes well, we (re-)set the authentication in the security context and delegate to the next filter in the chain. Note that we are setting the initial authentication, and not our OneTimePassword since the latter is only used for the authentication provider and not relevant for the rest of the application.
The final step is providing the AuthenticationManager to our filter. If you followed the tutorial, then chances are, Spring complains about not having an authentication manager available.
I am not sure if this is by design, but the only way I’ve made this work is by adjusting the SecurityConfig as follows:
@Configuration@EnableWebSecurity(debug = true)class SecurityConfig { @Bean fun chain(http: HttpSecurity, config: AuthenticationConfiguration, users: UserService): SecurityFilterChain { return http .authorizeHttpRequests { it.anyRequest().authenticated() } .httpBasic(Customizer.withDefaults()) .addFilterAfter( OneTimePasswordAuthFilter(config.authenticationManager, users), BasicAuthenticationFilter::class.java) .authenticationProvider(DaoAuthenticationProvider().apply { setUserDetailsService(users) setPasswordEncoder(encoder()) }) .build() } @Bean fun encoder(): PasswordEncoder = BCryptPasswordEncoder()}We let Spring inject the AuthenticationConfiguration which has the authentication manager so we can manually pass it to our filter. With that in place, we can now run the application and test the MFA functionality 🎉